IKEA desk hacking to mount a Rode mic arm
December 10, 2014 -I’ve been working from home more frequently the past few months for some reason, so I eventually bit the bullet and constructed a permanent home workstation. I’ll post up more details of my setup later on, but when I tweeted a pic of my mic arm, it got a fair bit of interest, so I thought I’d give a bit more detail here.
I bought a Rode Podcaster dynamic mic a few months ago to start experimenting with recording screencasts - both to distribute over the web, and also as a backup for an epic presentation demo failure. Now the important thing with sensitive microphones is that they’re shock-mounted to protect from bumps & knocks (and even just vibrations on the desk from keyboard use), as these tend to create significant noise in the recording. This is what my first setup looked like:

Suffice it to say, cheaping out on a proper shockmount & arm isn’t worth it - I supplemented this setup with the Rode PSM1 and PSA1 shortly afterwards.
The PSA1 comes with both a clamp-on mount and a through-desk mount. The clamp is the best option if you don't want to irreversibly modify your desk, but it’s not suitable for all desks: mine doesn’t have an overhang to clamp to. The through-desk mount involves drilling a hole in your desk to mount an insert - this is how it’s done:
Step 1: Drill a hole in your desk. There are two important components to this step - the drilling of the hole, and knowing where to drill the hole.
- Drilling the hole - it’s best to use a holesaw - a flat (spade) bit is not great for going through the particle board that most desks are made out of. 22mm is right for the Rode desk insert. My one looked like this:
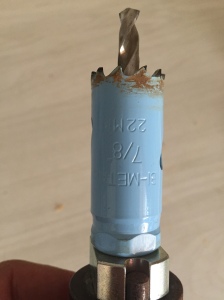 Make sure you drill from the top; the surface may be splintered or chipped when the holesaw exits. That said, the insert will cover an area around the hole anyway.
 - Knowing where to drill - the main considerations here are:
- Will it reach where you want it to reach? It's a bit difficult out of the mount, but I’d try holding the base of the arm in your proposed position and making sure the mic can be positioned comfortably. At full stretch, the arm will reach roughly 600mm from the centre of the hole.
- If you mount in the corner of your desk (as is common), is there enough wall clearance for the back of the arm? When weighted with something as heavy as the Podcaster, the arm can stick back about 120-130mm, unweighted (or if you push it), it can move back about 200mm.
- Don’t drill right on the edge - the lip of the insert will overlap nearly 30mm from the centre of the hole.
- Make sure you have clearance underneath the desk; the insert will probably stick through about 50-60mm.

Step 2: Push the insert into the hole & screw up the nut underneath. This is knurled; it’s just meant to be finger-tight.
Step 3: In my case, the desk drawers go nearly all the way to the back of the desk, and needed surgery to clear the bottom of the insert. I removed the drawer, carefully cut down with a handsaw, and used a sharp chisel to remove the section. It looks a bit rough, but hopefully no-one will see it.

Step 4: You’re done! Slot the arm into the insert and start recording.
